Constantly Creating Christine

creating food, creating crafts, creating memories, creating love, creating....a life.

Tuesday, February 15, 2011

Here's Lookin' at You, Valentine

This was the last year for any of my children to take in Valentines for the entire class, as Little will be in middle school next year and it's just 'not done'.  Sniff.  We have made so many various Valentines crafts throughout the year and the kids don't like to duplicate, so we were having a tough time finding something to do.

Enter Jamie.  Jamie is my neighbor.  Jamie is amazing.  A.MAZE.ING.  She is always smiling, she is always moving, and how wonderful is it to have a next-door neighbor who reads the same things that you do??  If you are down, Jamie can utter one of her common-sense sayings with her southern drawl and you immediately see the folly of your drama and feel better.  I co-direct the town Ecumenical Vacation Bible School with Jamie and at the end of it last year - we weren't sick of one another.  Mmm hmm...that's right.  We were still speaking.  Miracles happen folks.

Anyway, Jamie works in an elementary school and we had just done a games purge of games that we loved but they were for a younger age than we are now (sniff - sob - don't go there Christine) and so we were bringing the games and puzzles to her to bring to the school.  She pops to the door and opens it with a huge smile and says "I just finished making my Valentines for school - wanna see?"  We saw, and we were hooked - LOVE these.  Easy peasy lemon squeezy too.

Valentine's Glasses


Materials:

Pencil
Cardstock in colors of your choice (construction paper is too flimsy - ask me how I know) 
Scissors
Stapler


Cut template out of heavy paper or cardstock - or an old file folder.  
Trace pieces on cardstock onto cardstock, cut out and staple ear pieces to the front of the glasses.  We tried brads (those little office buttons that have two metal ends that you push apart to hold the button on) and they looked cuter on the front, but got caught in hair.  Write your saying on the front of the glasses.  Sign the inside or outside of the temple part.  


Other sayings:
"Here's Lookin' at You, Valentine"
"Look Who Loves You"
"Eye Love You"
"Eye think you Look like a Great Valentine"


Monday, February 14, 2011

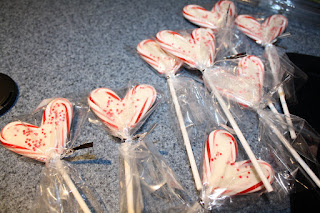
Valentine's Day: Candy Cane Chocolate Heart Pops


Happy Valentine's Day!

When I was little, Valentine's Day meant making a 'mailbox' out of a milk carton and then hoping that someone would sneak a Valentine in. You see, 'back then', you only made Valentines for those children that you were friends with (or you made one for the person you liked and then didn't sign it). Valentines were made from those paper lace doilies, construction paper, paste from a jar, and glitter - LOTS of glitter - and we made them in art class.

Today there are many ways of having Valentines to send - you buy them in a box from the drugstore, you can buy candy at Target that has a convenient spot for you to write your name on it and give to the rest of the class, or you can make them....but the best thing is that you have to make them for EVERYONE in the class, thus sparing the bruised egos of small children.

This is my last year of having a child that brings in Valentines for the entire class. I'm sad about that. Copious amounts of coffee this morning have not made it any less so, but it has gotten me to the restroom more frequently where I can check my makeup and reapply the mascara that runs off my eyes when I think about the magnitude of that! My kids do Valentines old school - we make them. I have no judgement for the drugstore kind, for the candy kind...for my kids though, I think they appreciate a holiday a bit more when they have to work for it. So we make them.

This year we made two Valentines (it being the last year and all) and they are winners. The first are Candy Cane Chocolate Heart pops - totally inspired by Family Fun Magazine. LOVE Family Fun and have been using them as a craft resource for 15 years (ack).

Tomorrow I'll give you a LOOK at our other craft (that was a hint, people!)

Candy Cane Chocolate Heart Pops

Materials needed:


Small candy canes (unwrapped); Lollipop/sucker sticks; nonpariels/sprinkles in red, pink, white; almond bark or wilton melty disks or bag of white chocolate chips with a bit of shortening.
Place a sheet of waxed paper or parchment paper on a cookie sheet. Arrange candy canes in a heart shape around the lollipop stick.


Melt the chocolate your favorite way (in a microwave, a double boiler on the stove, the hood of your car...) and pour into a freezer-type zip top bag. I like the freezer type because they are a bit thicker and sturdier and have less a tendency to burst like the 'regular' zip top bags.

Snip the very corner, just a bit, of the bag and pipe the melted chocolate in between the candy canes and around the stick. You don't have to rush, the chocolate will stay smooshy for a little while. In between filling, rest the tip on a small piece of wax paper - it will leak a bit. Smooth the top of the chocolate with a knife, offset spatula, or your finger (shhhhh)

Sprinkle with nonpareils and put in the fridge or freezer (or deck if it happens to be four degrees out) until the chocolate is firm.
Peel off the wax paper/parchment and store in an airtight container, wax paper between the layers, in a cool and dry place. You can also put them in cellophane lollipop wrappers to separate them.

Happy Valentine's Day!


Tuesday, January 18, 2011

The Birthday Baking Continues...


...with treats for the Bear to bring to school! Thanks to The Decorated Cookie for the original idea and Truly Custom Cakery for the tutorial - I think the fourth grade class is going to love these little guys - the Cupcake and I had a great time making them!'

Help! I'm melting!!


An army of melting snowpeople...


Monday, January 17, 2011

Creating again...


....and it feels so good....

I've been inspired by the various blogs I've been checking out to get back to that which makes me happy on the inside - creating. The trick is to feed that part of me while using the tools I've learned in this half a life to keep up with the rest. Goal-oriented people aren't the best at moderation - tending to want the entire thing done to perfection RIGHT THEN. 2011 will be the year I wage the war to achieve victory - the ability to do things IN MODERATION. :-)

The past few weeks the creating has been with food, who knows what it will be next. The Bear turned 10 this year but chose to receive a kayak in the spring for her gift instead of a party with her friends. To me, that didn't mean she should not have a great cake...so I hunted around and decided that I could make a Topsy Turvy Cake for her. Nothing like jumping back in on a technically and artistically difficult project. I used Google Images for my inspiration and made her cake (out of 3 boxed cake mixes - this thing was HEAVY). Purple and orange because they are her favorite colors, lime green because she wants a lime green kayak. It came out pretty well and she was THRILLED. We had a snow day....25 inches of snow will do that...so she was shooed from the kitchen most of the day, but she had a good time watching her new Nancy Drew movie, playing outside in the snow with the neighbors, and reading Chasing Vermeer (Dan Brown for kids). Someday I'm going to learn how to take a good indoor photo!

I didn't have time to make homemade fondant, so I used the big wedding cake box of premade stuff that you buy at the craft store. I kneaded in a few drops of clear vanilla extract, and then divided it into 60% purple, 20% orange and 20% green, using Americolor gel colors. Tutorials for the engineering of the cake (and it is, indeed, engineering) from Janellscakes and Cakecentral.com.


Monday, May 19, 2008

Missing....


....you. Every damn day. Happy Birthday in heaven, Pop.


Thursday, December 20, 2007

Russian Tea Cakes


Also known as Mexican wedding cakes, these have been traditional in my family since before I was born. They kind of 'poof' in your mouth in a cloud of sugary, buttery heaven. There is a picture of me on my first Christmas, four months old, with powdered sugar on my head while my dad is eating one of them :-)

Russian Tea Cakes

Mix thoroughyly:

1 cup butter
1/2 cup sifted confectioner's sugar (I use the bagged sugar which doesn't really require sifting anymore)
1 teaspoon vanilla

Sift together and stir in:

2/4 cup finely chopped nuts (I have used walnuts and pecans)

Chill dough. Roll into 1" balls. Place 2 1/2 inches apart on ungreased baking sheet. Bake until set but not brown. While still warm, roll in confectioner's sugar. Cool. Roll in confectioner's sugar again.

Temp: 400F
Time: 10-12 minutes
Amount: approx 4 dozen

Wednesday, December 19, 2007

Christmas Baking


My mother arrived on Saturday in time for a nice ice storm to sweep through our section of New England. Stranded in the house all day Sunday, we made a huge dent in the holiday baking...we followed it up with more on Monday afternoon. The kids love this time with their grandmother, baking up way more than cookies - memories, love, family togetherness - all emerge toasty from the oven along with the cookie sheets.